


What is Perspective in Photography (Complete Guide with Tips & Examples)
Master the art of using perspective in photography with this guide! Learn the types of perspectives plus 15 pro tips to help you nail it.
Shotkit may earn a commission on affiliate links. Learn more.
Just about every photograph you take will have an example of perspective in it. For example, things that are nearer or further away from the camera give the image a sense of distance.
This guide will describe the different types of perspective and introduce some of the terms – such as ‘virtual horizon’ – you may need to be aware of.
It then provides perspective tips and techniques for different situations and subjects. You won’t need special equipment, though alternative lenses (like a wide or telephoto lens) will expand the scope of what you can do.
So, let’s get started!
What is Perspective in Photography?
People’s eyes and cameras don’t work the same way. We see ‘stereoscopically’ – with two eyes – and interpret the visual information in front of us to see a three-dimensional world and understand what’s out there.
You may have learnt about perspective in art class at school. However, perspective is a bit different for the photographer. In photography, perspective can give an image distinctiveness and that individual quality we’re all looking for.
The painter uses perspective drawing techniques to create an illusion of distance, space and 3-dimensional form. For the photographer, ‘perspective’ exists out there; we just have to learn how best to capture it.
So when we talk about perspective in photography, we’re often talking about how we influence the viewer’s perception of the objects within an image.
The photographer can use angles, choice of focal length and camera settings – particularly aperture – to increase or decrease the sense of perspective in a scene.
Why Is Perspective Important in Photography?
In photography, perspective is an essential part of most scenes that we capture, helping to give them depth and a sense of distance.
The photographer can choose to select and accentuate the perspective aspects and create a strong visual framework for the main elements of their image – whether it’s a landscape, figures, the objects in a still life or a product shot.
Perspective can also impart a psychological effect in the viewer, helping to create the feeling of the image.
‘Aerial perspective‘ tends to present the world in a dreamy, reflective way. ‘Linear perspective’ tends to increase the drama of a scene or situation, pulling the viewer into the picture to the ‘vanishing point’.
Don’t worry – we’ll go over linear perspective and the other types of photography perspectives below!
Types of Perspective in Photography
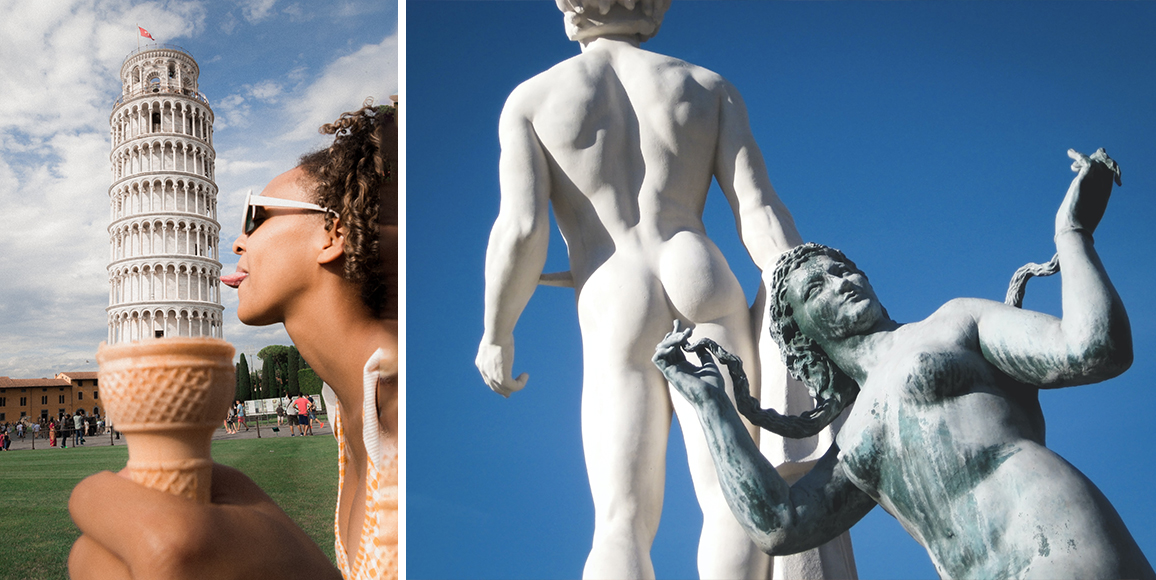
Credit: Jakob Owens (L) Jon Butterworth (R) | Funny overlap perspective examples
Before we look at the different types of photographic perspectives, it’s important to note that all types of perspective obey the law of relative size. This means that the further away something is, the smaller it looks.
There’s a much-used effect that demonstrates this which you’ll see in people’s holiday snaps the world over! Photograph someone close to the camera holding out their hand and appearing to hold a large object (such as the Leaning Tower of Pisa) which is actually hundreds of metres/yards away.
This optical illusion – also known as ‘forced perspective‘ – is of course achieved by carefully lining up the person and the object.
Now onto the different perspective types.
-
Zero Perspective
Zero perspective is the straight on – you could say flat – view in photography. It shows, for instance, the facade of a row of shops in which the lines of the roof, the windows, the doors, and the pavement will all be perfectly horizontal in the viewfinder. Zero perspective gives a two-dimensional look.
-
Linear Perspective
A good example of linear perspective is the road that stretches into the distance and seems to vanish into a single point on the horizon. Of course, we’re not really seeing converging lines – we’re seeing two straight lines that only appear to become narrower, thus creating a sense of depth.
How Much Do You REALLY Know About Photography?! 🤔
Test your photography knowledge with this quick quiz!
See how much you really know about photography...

-
Aerial Perspective
Aerial perspective is created by weather conditions. Looking out over a landscape from a high vantage point is a great way to show it – overall, it helps to make the background appear further away.
Aerial perspective in photography is caused by the nature of light itself – including its relatively short wavelength, and particles in the air such as moisture and dust. Three things happen the farther away you are from the horizon: there’s less contrast; there’s less saturation in the colours, and you see less detail.
-
Curvilinear Perspective
Special lenses, such as a ‘fisheye’, are designed to capture images as though they’re bending around the central focus or subject. These tend towards the high-cost end of photo equipment. Having noted them, we’ll continue this guide with examples using more standard lenses.
How Do You Show Perspective in Photography?
Below you’ll find 15 photography perspective tips to help you improve your compositions, draw in your viewer, and add a sense of depth to an otherwise two-dimensional image.
1. Understanding The Horizon Line

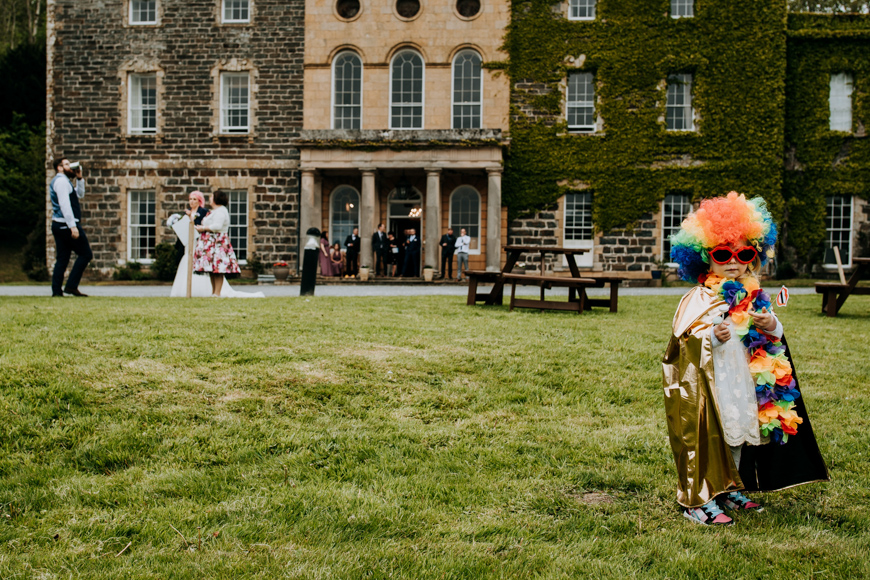
In this image, the horizon isn’t visible – but you can imagine the ‘virtual’ horizon line and where the ground slopes up to meet it.
Knowing where the horizon line is can be key to great photos and is pretty much essential to handling perspective photography.
Hold your camera to your eye and point it straight ahead of you. In the viewfinder, imagine a line horizontally across the middle of the frame of view – that is ‘the horizon line’.
Now project that line beyond the camera straight out onto the scene you are photographing, and you have an imaginary horizon line, sometimes called the ‘virtual horizon’. Your camera may have a ‘rule of thirds grid’ option, which will help you pick out your virtual horizon.
At the seaside, the horizon is clearly visible where the sky meets the sea, but in many situations, there are other things in the way – mountains, buildings, trees – so you have to imagine it, and it may not be where the sky meets the mountains or rooftops.
Try shooting the same scene with perfect verticals and horizontals and then again slightly ‘off’ true and you can see how awkward and unsettled the second image looks.
You can, of course, choose to ignore the horizon line for some images to great effect. This can emphasise a dynamic movement or an insecure feeling, or help to accentuate or create a comedic moment.
2. Using Single Point Perspective
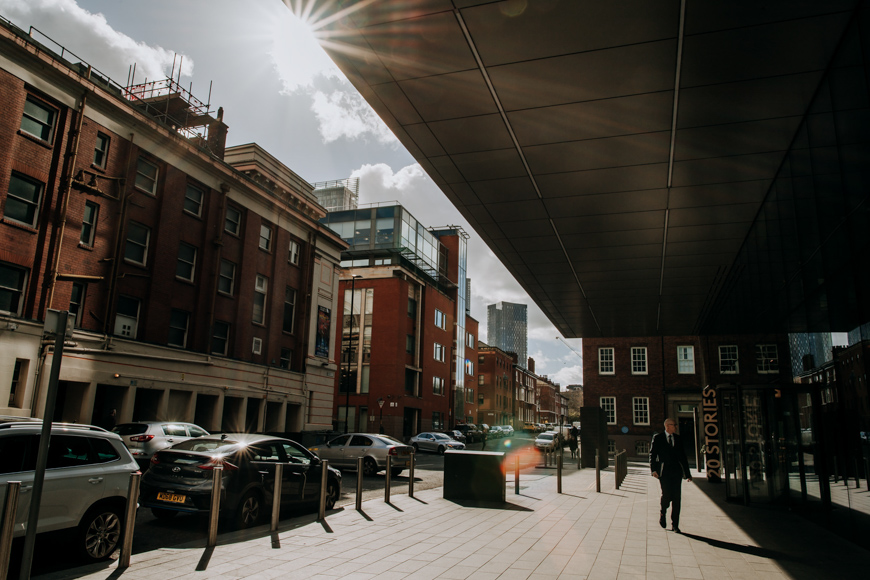
Here, the buildings in the street and the roof overhead create converging lines that all lead the eye of the viewer to a single point.
Single point perspective adds a sense of depth to photography and can be quite dramatic.
It is, of course, in some ways an illusion – the railway tracks don’t actually get closer together. You can use leading lines to accentuate the single point perspective illusion. Roads, railways, walls, fences, buildings and lines of trees are all things which emphasise distance – see our guide to leading lines photography here.
You can adjust your aperture to increase the effect. Make your focal point a subject closer to your lens with the horizon farther away, select a shallower aperture – such as f/1.8 – and you can greatly enhance your use of single point perspective.
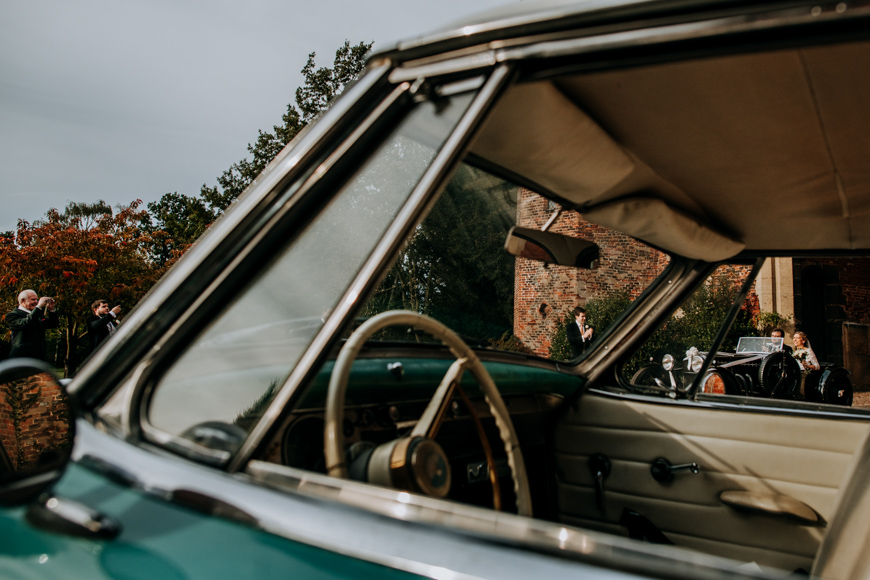
3. Use mirrors and reflections
You can use mirrors and reflections to play with perspective. Shooting into mirrors or reflective surfaces (such as highly polished cars or shop windows) can alter and distort the perspective of a figure and/or view being reflected.
Moving the camera around to look for different angles, altering the distance from the reflecting surface or changing lenses are all ways to create a new perspective. It’s just a matter of trial and error.
You also have to decide whether you and your camera want to be in or out of the scene.
4. Adjust your position
Moving your position can greatly alter the extent to which the perspective clues in a scene are perceived by yourself and consequently, the viewer. Photographers aren’t tripods!
5. Use a frame within a frame
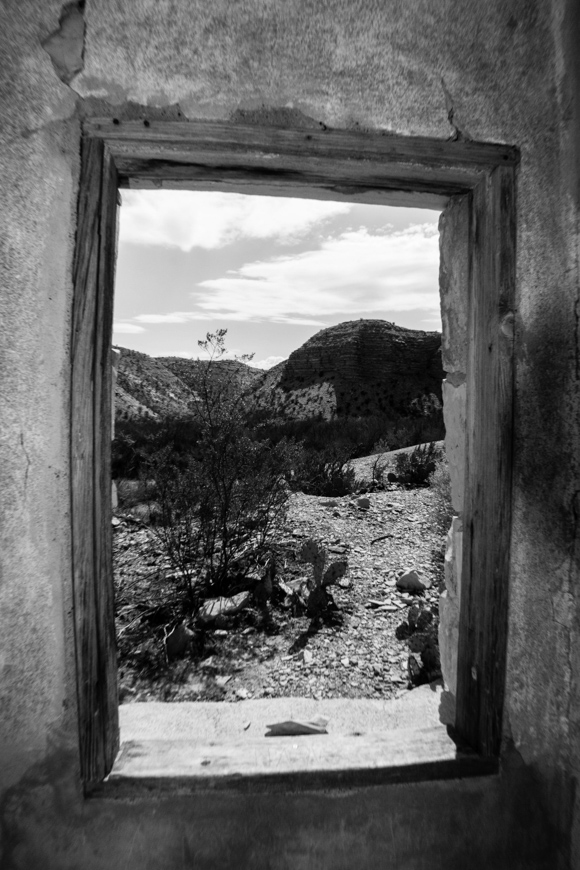
Using a frame within a frame is another way to create a unique photography perspective.
The camera creates a frame – roughly 3 x 4 in a non-medium format camera – though you can crop this to make a square or cinemascope view. But what if you were to create a frame within the camera frame through which your main subject will be seen?
A window with a landscape beyond it is a favourite viewpoint. Photojournalists often take images through the hole in the wall of a ruined building with the main scene or action seen through it.
As well as focusing attention on the subject, the nearness of the frame to the camera can hide the middle distance and the perspective clues and flatten the image.
6. Foreground, middle and far distance

A simplified way of creating perspective is by thinking of a scene, indoors or outdoors, as being made up three ‘layers’ – the foreground, the middle ground and the far distance.
In street photography, this happens quite naturally with figures close to the camera, the centre of interest in the middle area – say a street musician – and buildings in the distance. The figures in the foreground may be in half-focus and make almost abstract shapes but will help to create a sense of distance and make a visual space for your main subject.
Depth of field will aid this technique and can easily be used in landscapes – a large rock with the landscape beyond – or in a room where the main subject is seen beyond, say, a vase of flowers.
Sometimes you may wish to stop down your aperture; however – this flattens the perspective and seemingly brings all the figures closer together.
7. Altering the viewpoint
Try altering the vantage point from where you shoot – instead of staying at eye level, get down low or put your camera up high.
A low viewpoint looking up to the horizon line will increase the immensity of figures, buildings, trees, sculptures or whatever you focus on and increase the amount of sky in the picture.
A higher viewpoint will increase the amount of ground or flooring and show objects and figures from above.
Experimenting with viewpoint is a great way to convey metaphoric meaning in your image, showing a subject as lofty and elevated or grounded and small.
8. Using extreme viewpoints

Taking that one step further, extreme viewpoints – bird’s eye or a worm’s eye level – can literally alter your perspective of a subject in a scene.
Getting up high – on a building, say, or via a drone – and looking down shows the world akin to a map, with people and vehicles diminished to miniature scale.
Getting down low – lying on the ground, on the foot of a bank, under a bridge – will show figures with very big feet and their heads firmly in the sky. Shoot up into buildings (especially tall ones) and the perspective effect sees them tapering into the clouds.
9. Wide focal length and perspective

Wide angle lenses not only capture a wide view, but actually capture a wider view than our eye can see (a 35mm lens gives the closest representation of what a human eye can see). The huge gain of such a lens is not without problems.
Typically, a wide angle lens appears to distort the view, though it isn’t so much the lens as the distance you are away from the subject. Get too close to your subject and that can create problems – try it and see!
But take an image of a field of flowers down low – almost touching the first row of flowers – and you can create a ‘low slung scene’ with the nearest flowers greatly enlarged and huge skies beyond. This is an exaggerated perspective which can be very striking.
Try a 14-24mm or 24mm prime lens when experimenting with wide angles in perspective photography.
10. Telephoto lenses and foreshortening
A telephoto lens brings the subject it’s trained on up close. It also compresses the perspective, bringing things in the background forward. They will appear as if stacked up against each other in a shallow space with the sense of perspective lost.
Foreshortening is the effect of things in the middle distance and background being pushed up to the foreground, exaggerating the size of the objects in the foreground and destroying the normal expectations of perspective.
A telephoto lens will make this effect extremely easy to achieve – try a 70-200mm or 105mm prime.
11. Using photo editing tools to alter the perspective
When editing your images, adjust the contrast, brightness or darkness on certain areas and you can increase the sense of perspective.
It’s a nuanced approach, but objects and people can be brought forward or pushed back in space.
12. Be aware of three-point perspective

Three-point perspective occurs if the structure you’re photographing is very high – for example, a tall building or very tall tree.
When photographing a building, not only can the two side walls seem to recede in different directions – that’s two vanishing points – but the elevation may also seem to converge onto its own vanishing point in the sky – that’s the third one.
Look at a skyscraper. If you find the third perspective unsettling or distorting, you can use Photoshop, Lightroom or other photo editing tools to ‘correct’ it, as explained below.
- Read more: How to use Vanishing Point in Photoshop
13. Correcting perspectives
In an image like this one, you want the row of buildings to be neatly running in a straight horizontal line. If the point of view was slightly off, it could be corrected in post-processing.
Correcting unwanted distortions with digital tools like Photoshop can help put right what you judge to be a distorted perspective. It’s best to try it out with some old images you have so you can see what’s possible.
Within Lightroom, you can use the Transform tools to straighten the perspective of a building. If you want to do this in-camera, you could avoid distortion by using a specialist tilt-shift lens.
14. How to effectively work with aerial perspective

An example of aerial perspective photography. | Credit: Daisy S
To utilise aerial perspective, first find your location. For example, one popular option is looking down from a tall building onto towns and cities.
Mountain scenery is another classic setting; looking down from a high point across valleys, lakes, other mountains and maybe onto a plain or the sea.
Aerial perspectives alter both the colour and tone you see in the distance. Compare your colour image with a black and white version in camera or back at home with Photoshop. It’s also worth studying famous photographers like Ansell Adams for inspiration.
15. How to show a sense of scale
Choice of camera lens selects the frame of view, but focussing in on a subject can take away the clues of perspective and relative size. How big is the tree outlined against the sky? How big is the insect you zoomed in on with a macro lens?
Photographers can leave things as they are and let the viewer imagine size – you can even make a subject appear larger than it is. Or you can include something to give a sense of scale; a person standing by the tree, for instance.
Perspective Photography FAQs
How do you show perspective in photography?
Perspective can be conveyed by the photographer’s choice of lens focal length, camera settings (e.g., depth of field), and their use of angles.
Why is perspective important in photography?
Perspective gives scenes depth and a sense of distance and size to the objects in the photograph. By changing the perspective, the photographer can create a particular mood or change the story being conveyed through the image.
What is normal perspective in photography?
‘Normal’ is best described as a straight-on perspective (see also ‘zero’ perspective), shot from eye-level.
Final Words
Perspective can become the main subject of a photograph, though it’s very often part of the structure within which things occur and people act.
The photographer has to develop an awareness of perspective and how it can affect the images and situations they’re shooting. It can be allowed to settle unnoticed into the background or be accentuated.
As the photographer Derry Moore said, “The mechanics of photography are not difficult; what matters is training the eye.” So, the next photographs you take, consider the perspective of the scene and use the techniques I’ve discussed to bring a new dimension to your photography.
I hope you’ve found these perspective photography tips useful. Any questions at all, please leave a comment below and I’ll be happy to answer.

Check out these 8 essential tools to help you succeed as a professional photographer.
Includes limited-time discounts.


Patrick Mateer is an award-winning photographer who lives in Yorkshire, England with his wife (wedding photographer Hollie Mateer) and two children.

👋 WELCOME TO SHOTKIT!

🔥 Popular NOW:
